POSTS
Building a Lwc Popover
TIL; How to create a LWC Popover for displaying related records.
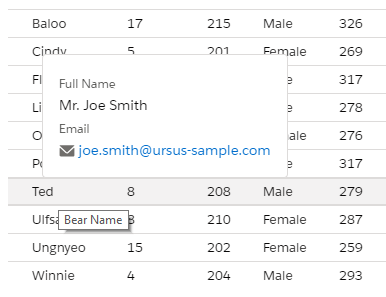
In this post, we will create a popover that displays related record details within an SLDS Bluprint of a Data Table using a Record View Form.
Getting Started
You will need to get yourself setup with Salesforce-DX, and will use Salesforce’s Ursus Park Sample repository which can be cloned from Github.
Steps To do
- Clone the Ursus Park sample app
- Create the data table
- Create a Popover Component
- Embed the Popover component in the table template
- Test it
Clone the Ursus Park sample app
clone the sample repository to a local directory and navigate to it you :
git clone https://github.com/trailheadapps/build-apps-with-lwc.git
and go to the recently cloned repository directory
cd build-apps-with-lwc
Create the data table
Use a SLDS Data Table Blueprint for displaying data in an app.
sfdx force:lightning:component:create --type lwc -n bearTable
Data Table Template
<template>

        <table class="slds-table slds-table_cell-buffer slds-table_bordered">
            <thead>
                <tr class="slds-line-height_reset">
                    <th class="slds-cell-buffer_right" scope="col">
                        <div class="slds-truncate" title="Bear Name">Name</div>
                    </th>
                    <th class="slds-cell-buffer_right" scope="col">
                        <div class="slds-truncate" title="Bear Age">Age</div>
                    </th>
                    <th class="slds-cell-buffer_right" scope="col">
                        <div class="slds-truncate" title="Bear Birthday">Birthday</div>
                    </th>
                    <th class="slds-cell-buffer_right" scope="col">
                        <div class="slds-truncate" title="Bear Height">Height</div>
                    </th>
                    <th class="slds-cell-buffer_right" scope="col">
                        <div class="slds-truncate" title="Bear Sex">Sex</div>
                    </th>
                    <th class="slds-cell-buffer_right" scope="col">
                        <div class="slds-truncate" title="Bear Weight">Weight</div>
                    </th>
                </tr>
            </thead>
            <tbody>
                <template if:true={bears.data}>
                    <div class="slds-m-around_medium">
                        <template for:each={bears.data} for:item="bear" for:index="index">

                            <tr class={assignClass} key={bear.Id} data-rangerid={bear.Supervisor__c} onmouseout={hideData} onmouseover={showData}>

                                <td data-label="Bear Name" class="slds-cell-buffer_right">
                                    <div class=slds-truncate title="Bear Name">{bear.Name}</div>
                                </td>
                                <td data-label="Bear Age" class="slds-cell-buffer_right">
                                    <div class="slds-truncate" title="Bear Age">{bear.Age__c}</div>
                                </td>
                                <td data-label="Bear Birthday" class="slds-cell-buffer_right">
                                    <div class="slds-truncate" title="Bear Birthday">{bear.Birthday__c}</div>
                                </td>
                                <td data-label="Bear Height" class="slds-cell-buffer_right">
                                    <div class="slds-truncate" title="Bear Height">{bear.Height__c}</div>
                                </td>
                                <td data-label="Bear Sex" class="slds-cell-buffer_right">
                                    <div class="slds-truncate" title="Bear Sex">{bear.Sex__c}</div>
                                </td>
                                <td data-label="Bear Weight" class="slds-cell-buffer_right">
                                    <div class="slds-truncate" title="Bear Weight">{bear.Weight__c}</div>
                                </td>
                            </tr>

                        </template>
                    </div>
                </template>
            </tbody>
        </table>

</template>
Data Table Controller
import { LightningElement, track, wire } from 'lwc';
import searchBears from '@salesforce/apex/BearController.searchBears';

export default class customSearch extends LightningElement {
    @track searchTerm = '';
	@track bears;
	@track ranger;
	@track left;
	@track top;

    //load bears - we are re-using the searchBears controller from the sample application
	@wire(searchBears, {searchTerm: '$searchTerm'})
	loadBears(result) {
        this.bears = result;
	}

    //when the cursor changes the rows to one with a ranger id, we populate the popover component with its id
	showData(event){
		this.ranger = event.currentTarget.dataset.rangerid;
		this.left = event.clientX;
		this.top=event.clientY;
	}

    //when the cursor changes the row or is no longer in it, we clear the ranger id
	hideData(event){
		this.ranger = "";
	}
}
Create a Popover Component
We will use a lightning-record-view-form to display the Ranger’s data in the popover.
First, create the component:
sfdx force:lightning:component:create --type lwc -n boxPopover
Popover Template
<template>
    <div>
        <template if:true={ranger} >
            <lightning-record-view-form
                    record-id={ranger}
                    object-api-name="Contact">
                <div class="popover slds-box" style={boxClass}>
                    <lightning-output-field field-name="Name">
                    </lightning-output-field>
                    <lightning-output-field field-name="Email">
                    </lightning-output-field>
                </div>
            </lightning-record-view-form>
        </template>
    </div>
</template>
Popover Controller
There are a couple of things to consider in the controller, since we are unable to dynamically create classes in the template itself, we do it in the controller. (in aura, doing it in the markup would have been possible - this does not mean that its the best idea though)
import { LightningElement, api, track } from 'lwc';

export default class BoxPopover extends LightningElement {
    @track ranger;
    @track top = 50;
    @track left = 50;

    @api
    get myranger(){
        return this.ranger;
    }
    set myranger(value) {
        this.ranger = value;
    }

    @api
    get topmargin(){
        return this.top;
    }
    set topmargin(value) {
        this.top = value;
    }

    @api
    get leftmargin(){
        return this.left;
    }
    set leftmargin(value) {
        this.left = value;
    }

    get boxClass() {
        return `background-color:white; top:${this.top - 280}px; left:${this.left}px`;
      }
}
Popover Css
important to add the position:absolute and z-index attributes in a stylesheet.
.popover{
    position: absolute;
    z-index: 9;
}
Test it!
